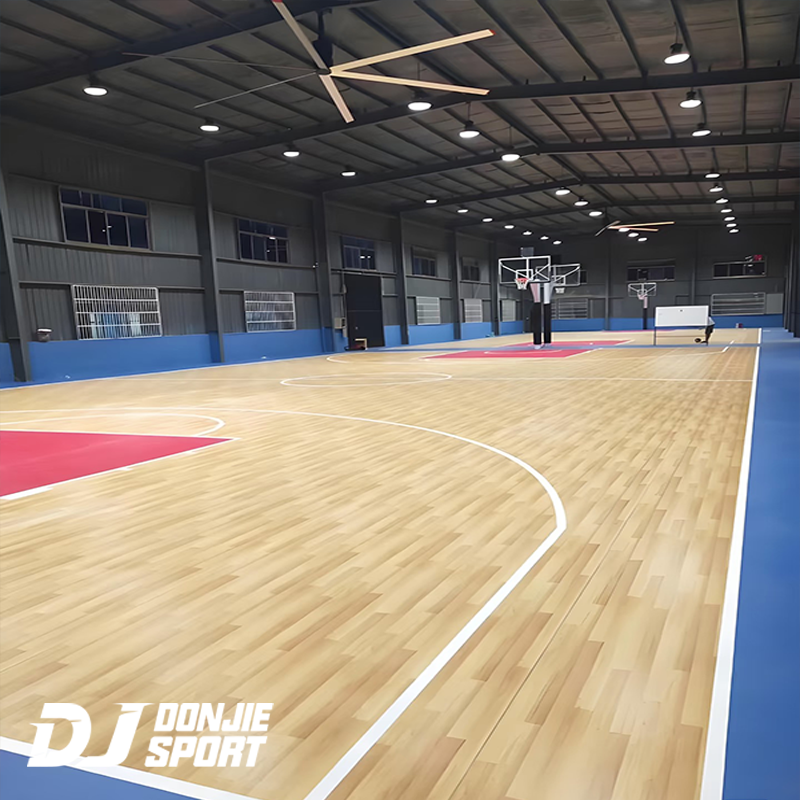
When it comes to building or upgrading a basketball court, selecting the right flooring is essential for both performance and safety. Basketball court wood flooring, in particular, offers a combination of durability, aesthetics, and shock absorption, which makes it the preferred choice for many professional sports facilities. Installing wood flooring correctly can ensure that the court remains in top condition for years, providing an optimal playing surface while maintaining its visual appeal. However, achieving the perfect result requires more than just choosing the right materials. In this article, we’ll walk you through the best practices for installing basketball court wood flooring, covering everything from selecting the right wood to maintenance tips for long-lasting durability.

Choosing the Right Wood for Your Basketball Court
Selecting the right wood for your basketball court is a critical decision that impacts both the performance and longevity of the floor. Not all types of wood are suitable for the heavy wear and tear associated with basketball games, so it’s important to choose a high-quality option that can withstand constant activity.
Types of Wood Commonly Used for Basketball Courts
The most commonly used types of wood for basketball courts are maple and oak, with maple being the most popular choice. Maple wood is known for its resilience, smooth surface, and shock-absorbing qualities, making it ideal for high-impact sports like basketball. Oak, while also durable, has a slightly harder texture, which can result in a less forgiving playing surface but offers excellent longevity.
Factors to Consider When Selecting Wood
When selecting the wood, there are several factors to consider:
-
Durability: Basketball courts endure a lot of pressure from foot traffic, dribbling, and occasional falls. Opt for wood that can handle these demands without warping or cracking.
-
Appearance: The aesthetic of your court matters, especially for professional or commercial spaces. Maple tends to have a more uniform and lighter appearance, while oak may offer a more rustic, textured look.
-
Cost: While maple is often the preferred option due to its performance and appearance, it can be more expensive than other types of wood. Assess your budget and determine if the investment is worth the added benefits.
Preparing the Subfloor for Installation
Before laying the wood, proper subfloor preparation is vital. A strong, level subfloor ensures that your basketball court wood flooring remains secure and stable over time.
Importance of Proper Subfloor Preparation
An uneven or improperly prepared subfloor can lead to creaking, buckling, or gaps in the wood flooring, which can be hazardous for players. A well-prepared subfloor also helps prevent moisture buildup that could warp or damage the wood.
Steps to Ensure a Solid Foundation
Start by checking the subfloor for any irregularities such as moisture, debris, or unevenness. Make sure that the surface is level and dry. If you’re working with a concrete slab, it’s essential to apply a moisture barrier to protect the wood from potential water damage. A proper moisture level (ideally below 60%) in the subfloor is necessary to prevent swelling or contraction of the wood planks after installation.
How Moisture and Temperature Affect Installation
Wood is sensitive to changes in moisture and temperature, so it’s essential to acclimate the wood planks before installation. Allow the wood to sit in the room where it will be installed for at least 48-72 hours to adjust to the ambient temperature and humidity. This helps prevent the wood from expanding or contracting once it’s laid down.
Tools and Materials Needed for Installation
Proper tools and high-quality materials will ensure that the installation process goes smoothly and results in a professional, durable finish.
Essential Tools for Installation
You’ll need a variety of tools for cutting, fitting, and securing the wood planks. The most important tools include:
-
Circular saw or table saw for cutting wood planks to size
-
Nail gun or stapler for securing the planks to the subfloor
-
Measuring tape and square to ensure accurate cuts and layouts
-
Floor buffer for sanding the wood after installation
-
Protective gear such as gloves, goggles, and knee pads
High-Quality Adhesives and Finishes
For the best results, use strong adhesives that are specifically designed for wood flooring. These adhesives should provide a long-lasting bond and maintain flexibility over time. As for finishes, polyurethane or other professional-grade finishes will protect the floor from moisture, dirt, and wear. A gloss finish is often preferred in basketball courts, as it provides a sleek, shiny appearance that reflects light well.
Recommended Wood Grades and Specifications
Always opt for Grade A or B wood for basketball courts, as these grades are free from defects and imperfections that could affect the playability of the court. Additionally, select wood planks that are at least 3/4 inch thick for durability and resistance to impact.
Step-by-Step Installation Process
Once your materials and tools are ready, it’s time to start installing the wood flooring. The process involves several steps to ensure that the floor is perfectly installed and finished.
Step 1: Measuring and Planning the Layout
Begin by measuring the dimensions of the court and creating a layout plan. Start from the center and work your way outward to ensure that the wood planks align properly with the boundaries of the court. It’s essential to account for the space around the edges to allow for expansion of the wood due to changes in temperature or humidity.
Step 2: Cutting and Fitting the Wood Planks
Once you have your layout, use a saw to cut the wood planks to the required size. Cut each plank precisely, and dry-fit them before securing them in place. This step ensures that the planks fit together snugly without gaps.
Step 3: Securing the Planks to the Subfloor
Using a nail gun or stapler, secure each wood plank to the subfloor. Start from the center and work outward, making sure each plank is tightly fastened to avoid movement or shifting over time.
Step 4: Sanding and Finishing the Wood Floor
After the planks are installed, use a floor buffer to sand the surface smooth. Sanding ensures that the floor is even and free of rough spots. Once sanding is complete, apply a protective finish to seal the wood and give it a polished look.
Step 5: Applying a Protective Finish
The final step is to apply a finish that will protect the wood from dirt, moisture, and abrasions. Apply at least two coats of a high-quality polyurethane finish, allowing the finish to dry completely between coats. This layer of protection ensures that your basketball court wood flooring remains in top condition for years to come.
Common Mistakes to Avoid During Installation
Installing basketball court wood flooring is a big project, and avoiding certain mistakes can make the difference between a flawless finish and costly repairs.
Incorrect Moisture Control
One of the biggest mistakes is failing to control moisture levels in the subfloor and wood planks. Excess moisture can cause the wood to warp or swell, leading to uneven surfaces or damaged planks.
Poor Subfloor Preparation
Skipping or inadequately preparing the subfloor can result in a floor that is not level or secure. This can cause the wood planks to shift or develop gaps over time.
Using Inappropriate Adhesives or Finishes
Using low-quality adhesives or finishes can lead to peeling, wear, or insufficient protection. Always choose products that are specifically designed for sports flooring to ensure longevity and durability.
Maintaining Your Basketball Court Wood Flooring
Even after installation, maintaining your basketball court wood flooring is essential for long-term durability. Regular cleaning is key to preserving its appearance and functionality.
Regular Cleaning and Upkeep Practices
Clean the floor regularly to remove dirt, dust, and debris that could cause scratches or damage the surface. Use a soft broom or vacuum with a hardwood floor attachment to avoid damaging the finish. Avoid harsh cleaning chemicals, which can strip the protective coating.
How to Protect Your Wood Floor from Wear and Tear
To protect your court from excessive wear, consider applying a fresh coat of finish every few years. Additionally, using floor mats in high-traffic areas can help prevent damage. If your court sees heavy use, periodic sanding and refinishing may be necessary to maintain a smooth, even surface.
Conclusion
Installing basketball court wood flooring is a significant investment, but with the right practices, you can ensure that it lasts for years and provides an optimal playing surface. From selecting the best wood to proper installation techniques and ongoing maintenance, following these best practices will help you achieve a durable, high-quality basketball court floor. Whether you’re building a new court or upgrading an existing one, professional installation and care will preserve the integrity of your basketball court wood flooring for generations of athletes to enjoy.